智能楼梯插件源码解析
本教程以酷大师官方提供的“智能楼梯插件”为例,展示:
- 如何使用沙盒 JS 代码,使插件弹出 UI 面板
- 如和在沙盒 JS 代码和插件 UI html 之间发送和响应自定义消息
- 如何调用 Plugin API,生成复杂的几何造型
用户在启动该插件后,会弹出插件面板,其原理是插件沙盒代码中调用接口app.getPluginUI().mount()将插件UI展示出来。
同时我们在插件的沙盒代码中调用了app.getPluginUI().onMessage()方法注册了一个消息相应函数到酷大师,用于响应插件UI发送的消息。
当用户输入楼梯参数,并且点击生成楼梯按钮时,插件UI代码中执行window.parent.postMessage()方法,将楼梯参数传送至已注册的消息相应函数中,消息响应函数根据传送过来的楼梯参数,判断其是否满足条件,如果满足条件,生成楼梯。
如果生成过程中发生错误,关闭插件。 其核心代码如下:
//沙盒代码
import { drawStairs, isRectangleFace, StairData } from "./drawStairsUtils";  // 绘制楼梯相关utils导入

const toastError = '请选择1个矩形平面';
const toastLoading = '加载中,请稍候...';
const toastSpaceCompare = '栏杆间距不能小于栏杆直径,请重新设置';
app.getPluginUI().resize(250, 431);  // 设置智能楼梯UI尺寸
app.getPluginUI().mount();  // 显示智能楼梯UI

/* 定义插件UI消息响应函数,用于相应插件UI消息 */
async function onUIMessage(data: any, origin: string) {
    try {
        const stairData: StairData = data;  // 接收插件UI发送过来的消息
        if (stairData.railingSpacing < stairData.railingDiam) { // 判断扶手直径是否大于扶手间距
            app.getToast().info({content: toastSpaceCompare}); // 如果不满足条件弹出toast,程序返回
            return;
        }
        const selectedEntities = app.getSelection().getAllEntities();
        if (selectedEntities.length !== 1 || !isRectangleFace(selectedEntities[0])) { // 判断用户选择的面是否是矩形面
            app.getToast().info({content: toastError}); // 如果不满足条件弹出toast,程序返回
            return;
        }
        app.getToast().loading({content: toastLoading, timeout: 100000}); // 弹出toast.loading提示,如用户没有清楚提示,则该提示一直存在
        app.setTimeout(() => {  // 调用toast.loading之后,必须设置延时,放开弹出提示
            try {
                drawStairs(stairData); // 生成楼梯
                app.getToast().clear();  // 清空toast提示
            } catch (error) {  // 捕获生成楼梯过程中的异常
                console.error(error); // 输出异常
                closePlugin();  // 关闭插件
            }
        }, 10);
    } catch(error) { // 捕获插件运行过程中的异常
        console.error(error); // 输出异常
        closePlugin(); // 关闭插件
    }
}

app.getPluginUI().onMessage(onUIMessage); // 注册消息响应函数到酷大师,用于响应插件UI发送的消息
// UI代码
window.parent.postMessage({stepHight, stepNumber, handrailHeight, handrailDiam, railingSpacing,  // // 向沙盒发送消息,包含用户设置的相关绘制楼梯参数
        railingDiam, withHandrail}, '*');
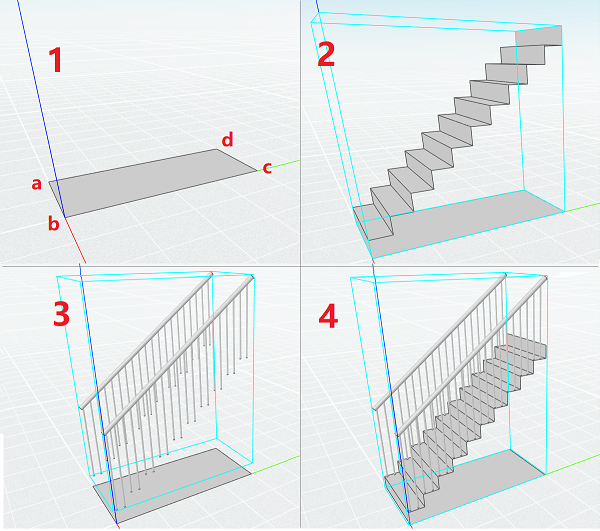
当用户绘制的参考面合法时,生成单跑楼梯的步骤如下图所示,共分为四步:
参考代码如下所示:
// drawStairs
export function drawStairs(stairData: StairData) {
    const selectedEntities = app.getSelection().getAllEntities();
    const sourceFace = selectedEntities[0] as KFace;
    const stairUpDirection = computeStairUpDirection(sourceFace);  // 计算楼梯的上方向
    if (!stairUpDirection) {
        return;
    }
    const sortedFaceVertices =  sortFaceVertices(sourceFace);  // 计算绘制单跑楼梯的参考点(矩形的四个顶点)
    if (sortedFaceVertices.length !== 4) {
        return;
    }

    const stepsInstance = createStepsAndMakeGroup(stairData, stairUpDirection, sortedFaceVertices); // 生成楼梯台阶并成组

    if (stairData.withHandrail) {
        const handrailAndRailingInstance =  createHandrailsAndRailingsAndMakeGroup(stairData, stairUpDirection, sortedFaceVertices); // 生成扶手和栏杆并成组;

        if (stepsInstance && handrailAndRailingInstance) {
            const activeDesign = app.getActiveDesign();
            activeDesign.makeGroup([], [stepsInstance, handrailAndRailingInstance], []); // 将上述步骤生成的两个组再次成组。
        }
    }
}
1、首先根据用户绘制的矩形面,找出楼梯所需的参考点a、b、c、d(矩形的四个顶点)和楼梯的上方向,以此四点和上方向绘制楼梯,核心示例代码如下:
// 计算楼梯上方向
function computeStairUpDirection(face: KFace) {
    const surface = face.getSurface();
    if (!surface || surface.getType() !== KSurfaceType.Plane) {
        return false;
    }
    const plane = surface as KPlane;
    const normal = plane.normal;
    if (normal.z > 0) {
        return normal.normalized();
    }
    return normal.reversed().normalized();
}
2、生成楼梯台阶并成组:
// 生成楼梯台阶并成组
function createStepsAndMakeGroup(stairData: StairData, stairUpDirection: KVector3d, sortedFaceVertices: KVertex[]): KGroupInstance | null {
    const refPtsForSteps = computeRefPtsForSteps(stairData, stairUpDirection, sortedFaceVertices); // 计算台阶所有面的参考点(每个矩形面为四个顶点)
    if (refPtsForSteps.length === 0) {
        return null;
    }

    const steps = createSteps(refPtsForSteps);
    if (!steps) {
        return null;
    }
    return makeGroup([steps]);
}

function createSteps(refPts: KPoint3d[][]): KShell | undefined | null {
    if (refPts.length === 0) {
        return ;
    }
    const res: KEdge[] = [];
    const activeDesign = app.getActiveDesign();
    const points = [...refPts[0]];
    const edges = activeDesign.addEdges(points)!;
    res.push(...edges.addedEdges);
    for (let index = 1; index < refPts.length; ++index) {
        const horPoints = [refPts[index-1][2], refPts[index-1][3], refPts[index][0], refPts[index][1]];
        const horEdges = activeDesign.addEdges(horPoints)!;
        res.push(...horEdges.addedEdges);

        const verPoints = [...refPts[index], refPts[index][0]];
        const verEdges = activeDesign.addEdges(verPoints)!;
        res.push(...verEdges.addedEdges);
    }
    if (res.length) {
        return res[0].getShell(); // 因为面是相连接的,所以所有的edge都在同一个shell中,只需返回第0个edge所属的shell即可
    }
    return;
}

function makeGroup(shells: KShell[]) {
    if (!shells.length) {
        return null;
    }
    const willGroupedFaces: KFace[] = [];
    shells.forEach(shell => {
        willGroupedFaces.push(...shell.getFaces());
    })
    const activeDesign = app.getActiveDesign();
    return activeDesign.makeGroup(willGroupedFaces, [], [])!.addedInstance;
}
3、生成扶手和栏杆并成组:
// 生成扶手和栏杆并成组
function createHandrailsAndRailingsAndMakeGroup(stairData: StairData, stairUpDirection: KVector3d, sortedFaceVertices: KVertex[]) {
    const handrailRefDatas = computeRefInfoForHandrails(stairData, stairUpDirection, sortedFaceVertices); // 计算扶手参考点,为扶手较低侧侧面圆心点
    const handrails = pullPushCircleFace(handrailRefDatas, stairData.handrailDiam/2);

    const railingRefDatas = computeRefInfoForRailing(stairData, stairUpDirection, sortedFaceVertices); // 计算栏杆参考点,为每个栏杆底面圆心点
    const railings = pullPushCircleFace(railingRefDatas, stairData.railingDiam/2);

    const shells: KShell[] = [];
    shells.push(...handrails);
    shells.push(...railings);
    return makeGroup(shells);
}

function pullPushCircleFace(pullPushDatas: PullPushData[], radius: number) {
    const res: KShell[] = [];
    const activeDesign = app.getActiveDesign();

    for (let pullPushData of pullPushDatas) {
        const circle = GeomLib.createCircle3dByCenterNormalRadius(pullPushData.point, pullPushData.dir, radius);
        const edges = activeDesign.addCircle(circle)!.addedEdges;
        if (edges.length === 0 || edges[0].getHalfEdges().length === 0) {
            continue;
        }
        if (!edges[0].getHalfEdges()[0].getLoop()?.getFace()) {
            continue;
        }
        let length = pullPushData.length;
        const face = edges[0].getHalfEdges()[0].getLoop()!.getFace()!;
        const faceNormal = (face.getSurface() as KPlane).normal;
        if (!faceNormal.normalized().isEqual(pullPushData.dir)) {
            length = -length;
        }
        activeDesign.pullPushFace(face, length, true);
        if (face.getShell()) {
            res.push(face.getShell()!);
        }
    }
    return res;
}
4、将第2步和第3步生成的两个组再次成组。